
1. The procedure for disassembling a solar float valve involves specific steps to ensure equipment integrity, and these steps include: (1) Prepare the workspace and gather necessary tools, (2) Disconnect the valve from the plumbing system, (3) Remove any attached components, (4) Carefully detach the float and other internal mechanisms, (5) Clean all parts thoroughly after disassembly. The disassembly process requires meticulous attention to ensure a successful reassembly and optimal functioning of the valve in any solar-powered application.
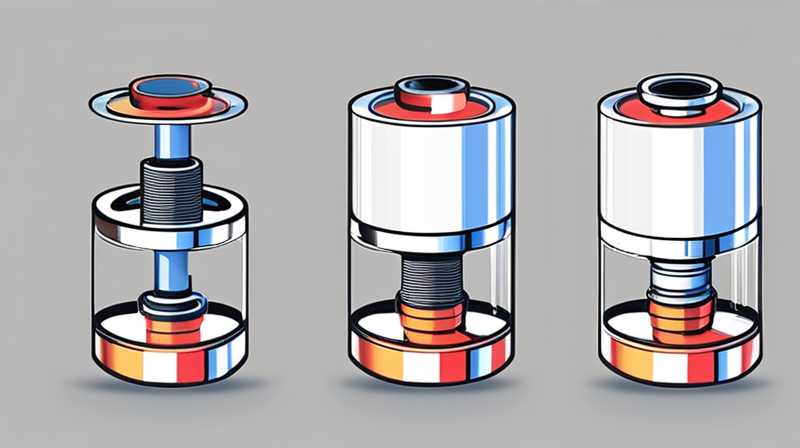
1. UNDERSTANDING THE SOLAR FLOAT VALVE
Disassembling a solar float valve is not only about separating its components; it also involves a comprehensive understanding of its function within the solar system. Solar float valves maintain the proper water level within tanks or reservoirs as part of a broader irrigation or water management system. The valve operates based on buoyant forces, regulating water flow based on the position of the float. Recognizing how this mechanism works is crucial for any maintenance or repair tasks.
Moreover, the implications of this valve in a solar system extend beyond mere functionality. It can significantly affect overall efficiency and water conservation. Hence, maintenance and disassembly can also be viewed through the lens of sustainability and resource management, highlighting the importance of a well-functioning solar float valve in conserving energy and minimizing waste.
2. NECESSARY TOOLS AND PREPARATIONS
Prior to embarking on the disassembly journey, it is imperative to ensure that the right tools are accessible and properly prepared for the task. Basic tools typically include a screwdriver, wrench, and pliers, as well as cleaning supplies. Each of these plays a crucial role in both the disassembly and reassembly processes, ensuring that individual parts can be accessed without causing damage.
Setting up a clean workspace cannot be overlooked. A clear and organized area allows for efficient progress and minimizes the risk of losing components. Additionally, it is advisable to place a towel or container under the valve to catch any residual water and prevent a mess. Proper logistics on this front facilitate a smooth operation when separating the various parts.
3. DISCONNECTING THE VALVE
To initiate the disassembly process successfully, the first step involves disconnecting the float valve from the overall plumbing system. This requires careful attention to detail, as any errors could lead to unwanted spills or damage to the valve or surrounding equipment. There are typically screws or bolts holding the valve in place, which must be removed with care to avoid stripping or damaging the threads.
Once the main connections have been released, it’s vital to check if additional fittings or connectors need to be unscrewed. This ensures that the valve is completely detached before proceeding with the next steps. During this stage, observing common issues such as corrosion or wear can provide insights into necessary future upgrades or replacements, fostering proactive maintenance practices.
4. REMOVING ATTACHED COMPONENTS
Upon loosening the valve from its primary connections, attention shifts to any attached components that may include fittings, diaphanisms, or protective casings. These parts may vary based on the model of the float valve, but understanding their function is essential to disassembly.
For example, a ball float is often secured using clips or screws and may have a connecting rod that links it to the valve mechanism. Carefully releasing these attachments prevents unwanted damage, maintaining the integrity of all parts. It’s advisable to label components or take photographs during this process for reference when reassembling.
5. DETACHING THE FLOAT AND INTERNAL MECHANISMS
With all external connections liberated, the next phase involves the careful disconnection of the float and the internal mechanisms. The float itself operates on buoyancy and must be removed gently to avoid damaging the valve body. Techniques such as twisting or gently pulling while maintaining support on the housing can help facilitate this process.
After extracting the float, attention should be diverted to the internal mechanisms, such as the rod or diaphragm communications between the float and the water control system. The dissection of these elements often reveals their operational capacity and wear, giving insight into their maintenance requirements. Observing wear patterns or blockages may provide crucial information on how to enhance efficiency moving forward.
6. CLEANING ALL PARTS THOROUGHLY
The disassembly process naturally leads to the necessity of cleaning. Each component should be subjected to thorough washing using appropriate cleaners, especially ecological ones that won’t damage the materials or negatively affect the water system. This not only extends the operational lifespan of each part but can also improve performance by removing buildups that may inhibit functionality.
Makings sure everything is dried appropriately post-cleaning is just as critical. Moisture can lead to rust or other forms of degradation, which can compromise the valve’s efficiency. Adopting a consistent routine for cleaning and maintaining solar float valve components establishes a reliable preventive maintenance strategy.
7. INSPECTING FOR DAMAGE OR WEAR
While reassembling the solar float valve, it is important to perform a thorough inspection for any damages. Common areas of wear might include seals, threads, or surfaces where components may come into contact. Identifying these issues early allows for proactive remedial action.
Should any components show signs of significant wear or damage, replacements should be considered. This not only enhances operational efficiency but also contributes to a longer lifespan, making it essential to engage in this detailed assessment before reassembly.
FAQs
WHAT IS A SOLAR FLOAT VALVE?
A solar float valve is a specialized device used primarily in water management systems associated with solar energy applications. It works by automatically controlling the water level in tanks and reservoirs. The float mechanism operates through buoyancy principles; as water levels rise, the float similarly ascends, eventually closing the valve when the desired level is reached. Conversely, when the water level drops, the float falls, allowing more water to enter. The efficiency of solar float valves significantly impacts resource management, making proper understanding and maintenance crucial.
HOW OFTEN SHOULD A SOLAR FLOAT VALVE BE MAINTAINED?
Regular maintenance of a solar float valve is crucial for sustaining its efficiency and prolonging its life. Recommended practices include routine inspections every three to six months, depending on water conditions and surrounding environmental influences. Key maintenance tasks include checking for leaks, verifying that the float mechanisms operate smoothly, and ensuring that all components are free from debris and build-up. Additionally, it is wise to clean the valve at the same interval to mitigate any sediment accumulation that could impede operation.
CAN I REPAIR A DAMAGED FLOAT VALVE?
Repairs of a damaged float valve are certainly feasible, provided that the damage is not extensive. Minor issues like worn seals and corroded components can often be addressed by replacing specific parts. Thorough inspection allows for the identification of repairable components versus those that necessitate full replacement. However, it’s essential to determine whether the time and effort for repair justify the costs, especially for older systems. Sometimes, upgrading to a newer, more efficient model may be a wiser long-term investment.
Carrying out disassembly of a solar float valve requires meticulousness and appropriate knowledge of both its components and function within the greater system. Proper preparation begins with understanding necessary tools that ensures efficient disassembly while safeguarding against unnecessary damage. The steps of disconnecting the valve, removing attached components, and detaching the float and internal mechanisms each function as integral parts of the process. Cleaning and inspecting these components allows for proactive management of issues that might arise, ensuring long-term operational success and sustainability in water management applications. By developing robust habits in maintenance, a solar float valve can support optimal extraction and management practices, ensuring that not only is water used efficiently, but also that it’s done so with as little impact as possible on the environment. Ultimately, knowing how to properly disassemble, maintain, and inspect these crucial devices contributes to their improved functionality, sustainability, and will have lasting benefits on water conservation efforts.
Original article by NenPower, If reposted, please credit the source: https://nenpower.com/blog/how-to-disassemble-the-solar-float-valve/
